
But maybe it's just me with no self-control. I am not to be trusted around a pan of these... let's just say that Justin and I nearly polished off the whole thing in a few days - I had to give away the last few pieces in fear that we might O.D.
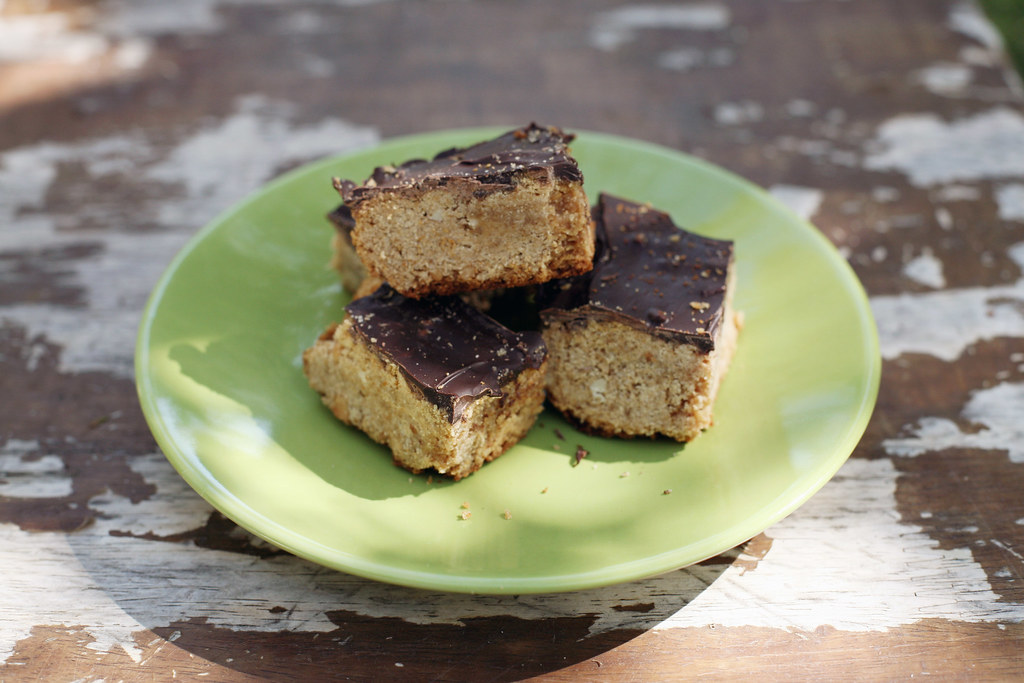
Chocolate-Covered Peanut Butter Bars
from here (she's a genius!)
2 cups whole wheat flour
1 teaspoon baking soda
3/4 teaspoon fine grain sea salt
1 cup natural, smooth peanut butter
1 cup pure maple syrup
1/3 cup extra virgin olive oil (I used coconut oil)
1 1/2 teaspoons vanilla extract
12-ounce bag of bittersweet or semi-sweet chocolate chips
Grease an 8-inch square cake pan. Line the pan with a strip of parchment paper, allowing the edges to hang over the sides of the pan. Grease the parchment paper.
Preheat oven to 350F degrees.
In a medium mixing bowl, whisk together the flour, baking soda, and salt. In a separate larger bowl whisk together the peanut butter, maple syrup, olive oil, and vanilla. Pour the flour mixture over the peanut butter mixture and stir until barely combined – still a bit dusty looking. Let sit for five minutes, give one more quick stir, just a stroke or two.
Press the dough into the prepared pan, using your fingertips or the bottom of a measuring cup to flatten the surface and create an even layer of dough. Bake for 25 to 30 minutes, until the bars begin to brown at the edges and are set. (Err on the side of under-baking here for a chewier almost fudge-y texture; otherwise, the bars can dry out and become a bit crumbly.)
As soon as you remove the bars from the oven, set the bars (in their pan) on a cooling rack. Scatter the chips on top of the bars and let stand for several minutes, until the chocolate chips have begun to melt. Using a small offset spatula or a butter knife, spread the melted chips into a smooth, even topping.
Let the bars cool completely in their pan until the chocolate has become firm. Using the overhanging parchment paper like a set of “handles,” lift the bars out of the pan and, using a very sharp knife, slice into bars. Store the bars in an airtight container. I like to keep them in the fridge, but if you do so, allow them to warm a bit at room temperature before serving (so the chocolate layer is not too hard).


8 comments:
temptress!!
What a sweet blog you have; thank you for sharing!
If you’d like, please stop by my blog for a chance to win an original giclee art print...by me :)
i just made these and the pan is already a third empty in just an hour!
Next time to you give away stuff like this, let this dog know! Don't want you guys getting sick or O.D.ing.
i could polish off a batch of those no problem, and I don't have the excuse of another person in my belly :) You're looking great!
doing this for myself for finals. enough said.
second time Ive made these in the past 6 days....
so easy and good.
just made a batch and I foresee they won't last us very long either.
Post a Comment